How to Use the Samsung Galaxy S7 Camera Settings

I have been the owner of a Samsung Galaxy S7 phone for 9 months and have written a review, based on my experience to date. You can see the review here.
This article is a Guide on how to use the Samsung Galaxy S7 Camera Settings. Some of the camera features were touched upon in my Smartphone Review, but this Guide will provide more detail on the cameras.
The Galaxy S7 and the Galaxy S7 Edge cameras work similarly, therefore, I will only reference Galaxy S7 in this Guide.
Samsung Galaxy S7 Camera Guide
The Galaxy S7 camera has a 12MP rear camera with dual pixel and a CMOS 5MP front camera. Take pictures or record videos using a variety of different effects, for all occasions.
The brighter F1.7 lens and larger 1.4µm pixels on the image sensor capture so much more light that your photos come out sharp and detailed. This makes it easy to shoot low-light photos with great detail.
Samsung Galaxy S7 camera settings for rear camera are slightly different from those for front camera. The camera settings on the Settings – Applications – Camera page are common for both Galaxy S7 front and rear cameras.


Before we get to the camera settings, we must first launch the Camera App.
You can launch the Galaxy S7 camera app in several different ways:
-
Use Galaxy S7 camera quick launch - You can press Home button twice to launch camera app instantly. Quick launch works even when the screen is off or locked. In the Camera Setting page, you can enable or disable Galaxy S7 camera quick launch.
-
Launch from Galaxy S7 lock screen - By default, the camera app icon is on the bottom right in the Galaxy S7 lock screen. Tap the camera app icon to launch the camera.
-
Launch from Galaxy S7 Home screen - By default, the camera app icon is in the favorite tray in Galaxy S7 Home screen. Tap the camera app icon to launch the camera.
-
Launch from Galaxy S7 Apps screen - Of course, all apps are found in the Galaxy S7 apps screen, therefore, you can tap the camera icon and launch the camera from there as well.
-
Launch Galaxy S7 camera app from other apps - Some other apps may launch Galaxy S7 camera app, but for a specific purpose. One example is that when you are using the Message app, you have the capability to attach a photo using the camera. The photo is normally taken for that specific app.

Note: The features on your screen may vary depending on the camera mode selected.
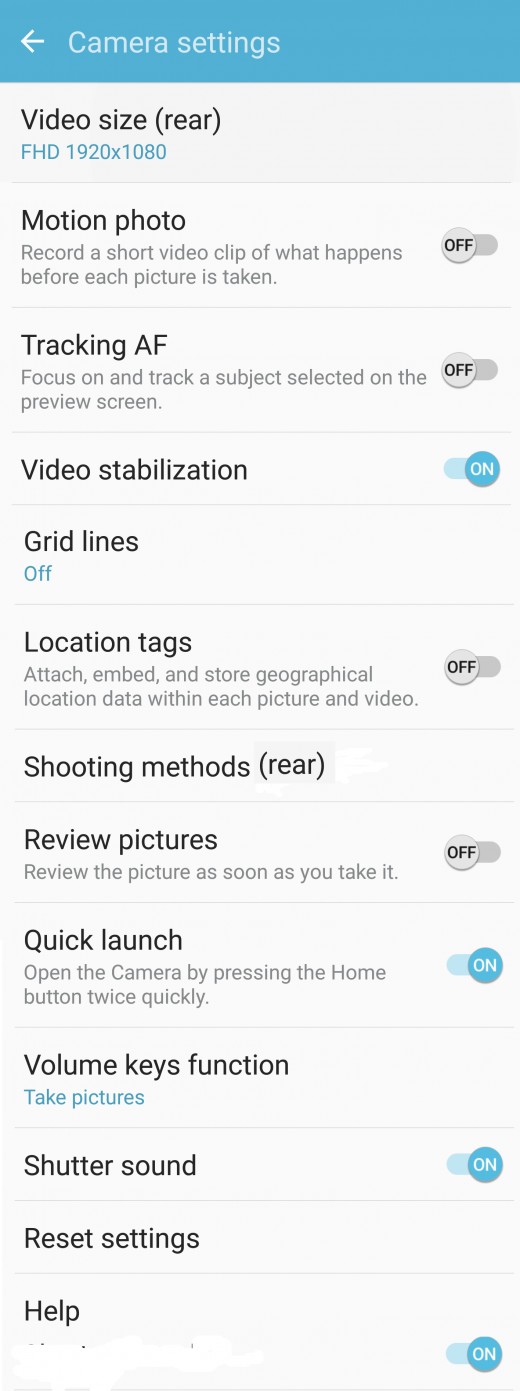
Camera Settings
The Samsung Galaxy S7 camera has some common settings for both rear and front cameras. Some settings are somewhat different for the rear and front cameras. The camera settings on the Settings – Applications – Camera screen are shown for both Galaxy S7 front and rear cameras.
The Galaxy S7 must be set for Standard mode to set these options.
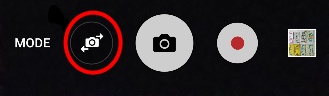
You can tap the front and rear camera switch (icon within red circle I added in image below) to switch between the two cameras.
I have shown both common and specific settings in this section.
The common camera setting are shown below:
- Motion Photo
- Video stabilization
- Grid Lines
- Location Tags
- Shutter Sound
- Review pictures
- Quick launch
- Volume keys function
- Reset settings
- Help
Motion Photo – When Motion Photo is set ON, the camera Records a short video clip of what happens before each picture is taken.
Video Stabilization – Tap on Video stabilization in Camera settings to turn it On or Off. The Galaxy S7 has a traditional optical image stabilization, a hardware feature that cushions the camera module to make the video more stable. In addition, there's traditional software-based video stabilization available in the Settings menu. The video stabilization Setting option only applies to the software stabilization.
There are reports that setting the video stabilization On may create some ghosting and blurring. I have not verified this problem.
Grid Lines – You can set Grid Line options if you prefer some help in aligning your subject within the screen. This option superimposes a set of lines across the display, giving you an easier guide with which to line up a horizon, as an example, than the bottom/top of the screen.
The options are OFF, 3x3 and Square. Tap on Grid lines in Camera Settings and select your option.

Location Tags – The location tags option allows you to attach, embed and store geographical location data within each picture and video. Tap on Location tags in Camera Settings to turn On or Off.
Shutter Sound - Tap on Location tags in Camera Settings to turn shutter sound On or Off.
Review Pictures – This option allows you to review the picture, for a few seconds, as soon as it is taken. Tap on Review pictures to set On or Off.
Quick Launch – You can open the Camera quickly by pressing the Home button twice quickly (even if phone is still locked).
Volume keys function - You can use volume keys to take photos, record videos or to zoom in or out. This can be very useful when you are using one hand to take photos. Tap on Volume keys function option in Camera settings prior to using this function.
Reset Settings – This option will restore your device to default settings if you ever have a need to do so (e.g., when the device crashes and resets itself or when apps freeze, hang or reset the device). A Reset resets all system settings (e.g., ringtones, sound settings, display settings, etc.) back to their default values. Personal data such as downloaded apps and media (pictures, videos, music) aren't affected.
Help – Tap the Help option in the Camera settings screen to get help with the following topics:
- Introduction to Camera
- Taking Pictures
- Recording videos
- Viewing pictures and videos
- Changing the camera mode
- Changing the settings.
Rear Camera Specific Settings
- Video size (rear)
- Tracking Auto Focus
- Shooting methods (rear)
- Save as RAW file
The Rear camera must be selected to set these options.
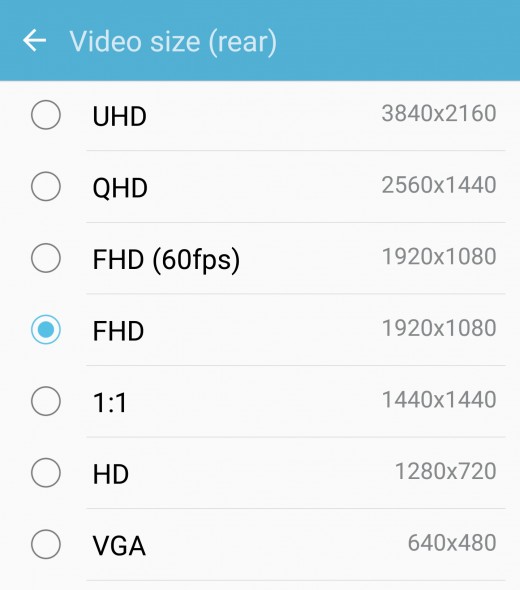
Video size (rear) - You can set the resolution and frame rate of the videos to be recorded. As you probably know, high resolution or high frame rate will make your video look better, but will require more data storage. If you want to set a specific frame rate, you will need to set this before recording the video. Tap on Video size (rear) in Camera Settings to select. Then tap to select the size you want to use.
At right, the video size options available for selection.
Tracking Auto Focus (AF) – Taking pictures of fast-moving objects can be a nightmare. The secret for these kind of shots is to enable Galaxy S7 Tracking AF. This option lets you select a focus point, which the Galaxy S7 then continually refocuses on as it moves or you pan around. Tap on Tracking AF in Camera Settings to enable.
Shooting methods (rear) – There are two shooting methods for the rear camera, tapping the shutter button and voice control. By voice control, you can take pictures by saying “Smile”, “Capture”, or “Shoot” or record videos by saying “Record Video”.
Save as RAW file – Saves pictures without compression in Pro mode only (Raw is the raw data from the sensor in a camera). Each picture will be saved as both RAW file and a compressed JPG file. A viewer App is required to view pictures saved as a RAW file. Burst shots cannot be saved as a RAW file.
Raw files are saved as a particular file type. In the case of the Galaxy S7, it uses the DNG digital negative format. The DNG files are saved to the internal device storage and you can find them in device storage > DCIM > Camera.
To access Raw on the Galaxy S7, you have to use the following process.
- Open the camera app
- Head into MODE and select the Pro mode.
- Tap the settings dial
- Toggle on the "Save as RAW file" option.
Front Camera Specific Settings
- Video size (front)
- Save pictures as previewed
- Shooting methods (front)
The Front camera (Selfie) must be selected to set these options.
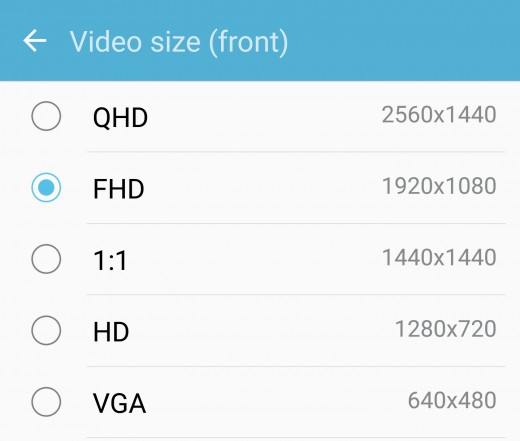
Video size (front) - If you want to set a specific frame rate for the front camera, you will need to set this before recording the video. Tap on Video size (front) in Camera Settings to select. Then tap to select the size you want to use.
The graphic shows the “video size” options available for the front camera.
Save pictures as previewed – Save all pictures you take as shown in the preview, not as flipped images. Tap on “Save pictures as previewed” in Camera Settings to enable.
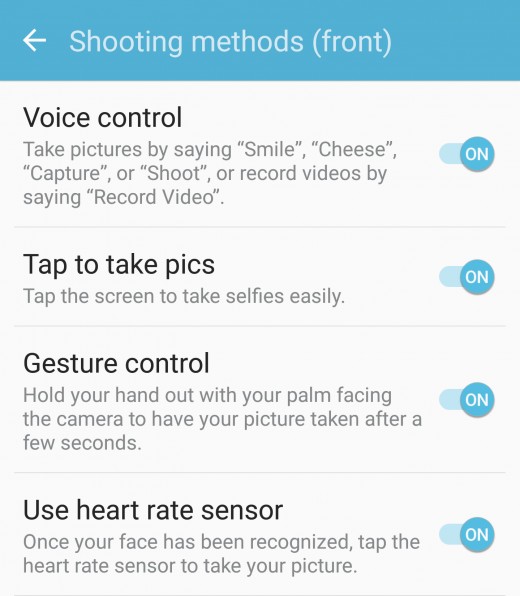
Shooting methods (front) - There are four shooting methods for the front camera.
-
Voice control – Take pictures by saying “Smile”, “Capture”, or “Shoot” or record videos by saying “Record Video”.
-
Tap screen to take pictures – Tap the screen to take selfies.
-
Gesture control – Hold your hand out with palm facing the camera to have your picture taken after a few seconds.
-
Use heart rate sensor – Once your face has been recognized, tap the heart rate sensor to take your picture.
To enable, tap on Shooting methods (front) in Camera settings and turn On or Off the shooting methods you want.
I personally keep all four methods enabled (On) at all times.
_____________________________________________________________________
Samsung Galaxy S7

_____________________________________________________________________
This concludes my Guide on “How-To Use the Samsung Galaxy S7 Camera Settings.”
If it has been useful or help to you, please let me know via a Comment or Rate this Article below..
You can read my Hub on “How-To Use the Samsung Galaxy S7 Camera Mode” here.