How to Make Your Own Table Saw


This is probably one of your more dangerous projects, so I would make sure you be thorough and very alert in all your steps and decisions. This should be done by a responsible adult experienced in safety procedures and in power tool know-how. This project is for those who are aware of dangers and possible problems associated with this type of project. All connections, supports and c-clamp anchors should be very solid, resistant to vibrations, done properly, well-checked initially, and re-checked often while using. Procedures for accidents or problems should be anticipated and a plan implemented and ready for each of these possible problems.
Other than that, don’t worry - be happy!
The first thing to decide is if you want to use an old table that you can put some holes in, or if you want to build one. Another possibility is to use a table that has a split for inserting an extra leaf. In either case, make sure the table is large enough, solid and capable of supporting the weight and swaying motion of a worm or circular saw. You’ll be pushing wood against the saw blade, the guide, and along the table, so the legs should be very solid for this treatment. Make sure the surface is sufficiently smooth enough to make the wood easy to slide. You may also consider using talc or baby powder to help reduce friction.
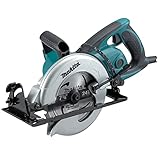
You may want to use an electric saw that you would otherwise retire, because you’ll probably be permanently removing the switch mechanism in its handle.
Measure the saw’s foot assembly; it’s width and length. On the table, draw a diagram of where you want to place the saw’s foot assembly (which will be on the underside of the table surface). Also, draw a line where the saw blade falls in that foot assembly. Cut a slot around that line, giving about a quarter of an inch on each side of the blade. Make the slot the length of the blades’ diameter. Cut two rectangular holes in the table next to the diagram of the foot assembly, on the side furthest from the blade. Do not cut into the foot assembly diagram, and make the holes large enough to accept two c-clamps.
Figure one shows a transparent table (only for this demonstration) to help you see how the saw is placed, and where the holes are cut for the c-clamps. It also shows optional measuring lines that you can draw, tape, cut or burn into the table for easy guide placement.

Next, have an electrician remove or bypass the switch inside the saw’s
handle, while putting a rotating switch in the cable, as shown in
Figure 2. Or, if you’re more ambitious, a switch can be wired into the
table. A toggle switch would be good, as this can be switched and and
off easily. If you wanted to do “safety,” you could put in a green
button for “on,” and red button for “off.” If you’re going to leave
this table saw without disassembling it, please child-proof the switch.
I
probably don’t need to tell you to not plug anything in until
everything is put in place and all safety precautions are taken care of.
Turn
the table upside-down and place on two saw horses. Pull back the
rotating blade guard on the electric saw and insert the sawblade into
the narrow slot you made. Fasten the foot assembly of the saw to the
table using c-clamps. Make sure the blade is free and clear of the wood
around it, and that it is perfectly parallel with the edge of the table. If possible, the c-clamp foot should be about 1 to 1-1/2
inches in from the edge. Use a piece of metal or a large, fat washer to
cushion the table-top, so you won’t make a hole in the wood with the
c-clamp. If the metal or washer has a sharp edge or burrs, put that
side against the table to reduce sliding. The further into the foot assembly you can get the c-clamp, the
more stability you’ll be giving the saw. If your foot assembly comes
with holes, or a bracket that can be removed, you can probably bolt the
saw to the table by using those holes, but make sure the bolt heads
don’t rise above the surface of the table top. If you have to sink the
heads into the wood, use washers to make the connection stronger and
less corrosive when the vibrations hit.
My saw is temporary; this one looks more permanent:

It may be necessary to
put a clamp on the opposite edge of the foot assembly, as shown in Figure 3. This will help assure more stability. Use a
lock-washer on the screw.
Put the table back on its feet, and
you now have your table saw ready to go. The c-clamps can serve as a
guide, if they’re the same distance from the blade. But it’s probably
better to make your own guide using wing nuts and slots in the table as shown in Figure 1. If you don't want to cut slots in the table, you can use c-clamps again. The blade’s height
can be adjusted the same way you’d do it with the saw, using its slide
bracket.


If you want a wider table to cut bigger pieces of wood
- like paneling - you can build a second level, as shown in Figure 4.
Invert the c-clamps, putting the bulkier part below the table. Bolt
this second-level top firmly to the table, cutting out holes for the
blade and for the c-clamps. Again, the blade’s height can be adjusted
using the sliding bracket.
When I made my own table saw, I used
a table without its center leaf. I used the cross-supports (that held
the table together) to attach the saw, using c-clamps. That arrangement
worked quite well, because I didn’t have to cut holes in the table top.
The art is done by yours truly. I say that, because there are major inconsistencies in the saw set-up in Figure 1. If you can tell me what I did that is radically wrong (not perspective or misshapen parts) you get extra points. I don't know of any other way to reward you, but maybe you can think of something.